One school databaseAdmissions, fees, exams, staff and transport stay connected.
Live product walkthrough
See every screen of Nipun India Schools ERP — without a video
Schools asked for a demo video. Instead, this page walks you through the real product flow with actual ERP screenshots and live UI mockups: school registration & login, student admission & Excel bulk import, staff creation, mobile app usage, exams & hall tickets, fee reports, and the complete bus module — including every sidebar option.
Live demo school · NIPUN-26-0001
User ID and password are already saved. Tap below — the demo school opens immediately.
12 guided sections
Real ERP screenshots
Mobile app screens
Fees + Bus reports
Role-based accessOwners, office staff, teachers, parents and students see relevant tools.
ERP + mobile appData entered by school staff reaches teacher and parent mobile views.
Prints & reportsReceipts, hall tickets, ID cards and operational reports are ready to use.
Choose your journey
What each school team gets from the ERP
Use this walkthrough as a principal, office administrator, teacher, accounts operator or parent. The same school data powers each role without duplicate entry.
Principal / Correspondent
Dashboard, admissions, collections, results and complete school oversight.
See management view
Office Administrator
Admissions, student records, certificates, communication and daily operations.
See office workflow
Teacher
Class attendance, homework, exam marks and personal workplace access.
See teacher workflow
Accounts Team
Fee plans, collection, receipts, dues, expenses and finance reports.
See finance workflow
Parent / Student
Fees, attendance, homework, notices, results and bus tracking on mobile.
See mobile experience
School registration & login
New schools create a free account, receive a Unit ID after approval, then sign in to the school ERP panel. Existing schools use the same login with their credentials.
-
1
Create free account Open Sign Up and enter school name, principal / correspondent details, mobile, email and city / district.
-
2
Instant Unit ID After submission you get a Unit ID. Our team verifies the school and activates the ERP workspace.
-
3
School login Go to Log In → School / Office. Enter mobile or Unit ID + password to open the franchise dashboard.
Each school’s data stays isolated by tenant — fees, students and exams never mix with another school.
Mockup: school registration form → login with Unit ID
Dashboard & full sidebar menu
After login, the school owner / principal sees the ERP dashboard. The left sidebar lists every module your office, teachers and accounts team use day to day. Below are real screens from the live ERP.
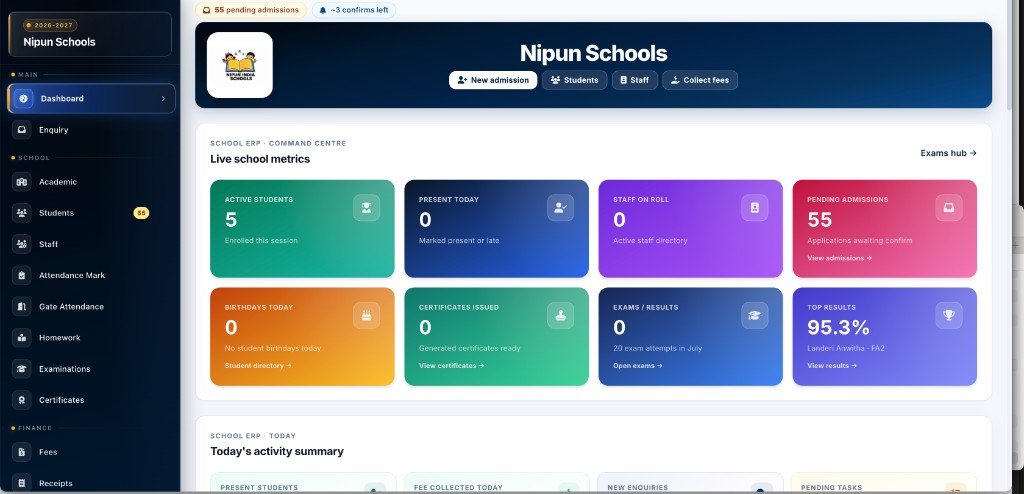
Real ERP screenshot — school dashboard with live metrics & full sidebar
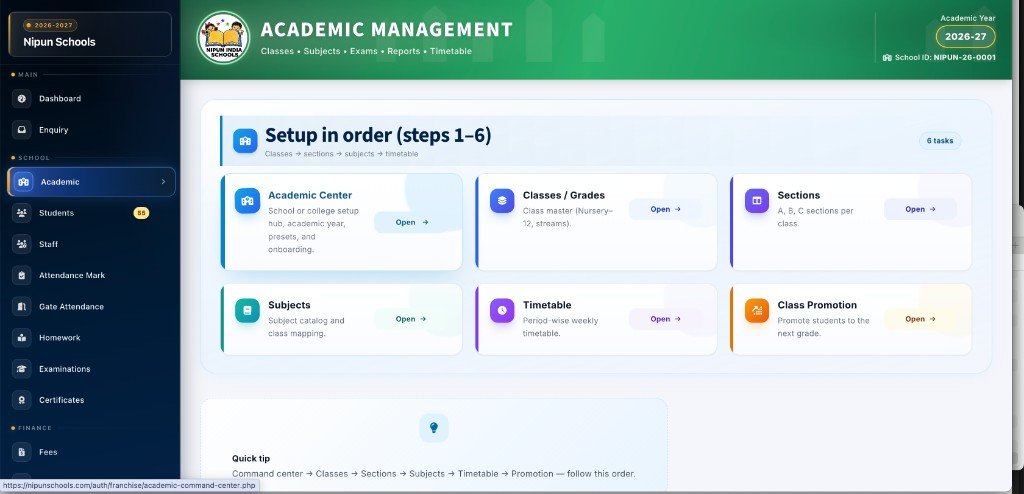
Real ERP screenshot — Academic setup in order (classes → sections → subjects → timetable)
Mockup: franchise dashboard with the full owner sidebar
Student admission (with section & IIT track)
Office staff opens Students → New Admission. Fill student details, pick class & section, set date of birth as DD/MM/YYYY, and for classes 6–10 choose IIT student or Non-IIT / General fee track.
-
1
Open New Admission Sidebar → Students → New Admission. One form for application + key family contacts.
-
2
Class, section & fee track Select class and section. For classes 6–10, choose IIT student or Non-IIT / General so fee plans match the track.
-
3
Date of birth DD/MM/YYYY Enter DOB in day / month / 4-digit year format — same format used on application print (A4).
-
4
Confirm in Applications Review the application, assign admission number, then the student appears in Student Directory.
IIT vs Non-IIT track for classes 6–10 is a core school option — fee structures and online IIT exams follow this choice.
Mockup: admission form with section, IIT track & DD/MM/YYYY DOB
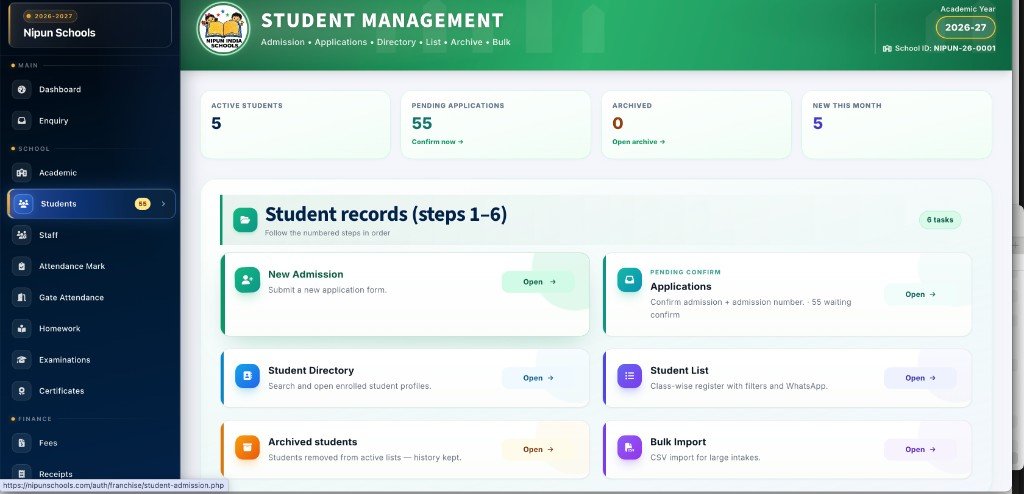
Real ERP screenshot — Student records hub: admission, applications, directory, list & bulk import
Students bulk import (Excel / CSV)
Migrating hundreds of students? Use Students → Bulk Import. Download the template, fill rows in Excel, upload, preview validation, then import in one go.
-
1
Download template Get the official CSV / Excel template with the correct column headers for your school.
-
2
Fill & upload Add student name, class, section, DOB, parent mobile and other required fields, then upload the file.
-
3
Preview & validate ERP shows row-wise OK / error badges so you can fix issues before importing.
-
4
Import Confirm import — students appear in the directory with the same isolation rules as single admissions.
Mockup: Excel upload → validation preview → import
Staff creation, roles & staff login
Principals create staff in ERP once. Those same credentials work for staff web login and for Teacher role inside the mobile app — no separate “app-only” users.
-
1
Staff Directory → Add staff Enter name, mobile, designation and role (Teacher, Accounts, Principal, etc.).
-
2
Share staff login Use “Share staff login” to send WhatsApp text with portal URL and credentials.
-
3
Staff logs in Staff login → select school (if linked to more than one) → open My workplace for attendance & salary view.
-
4
Same login on mobile Teachers open the Nipun Schools app, choose Teacher, and use the same mobile + password created in ERP.
Staff created in ERP are the same users parents and teachers meet in the mobile app — one source of truth.
Mockup: create staff → share login → workplace menus
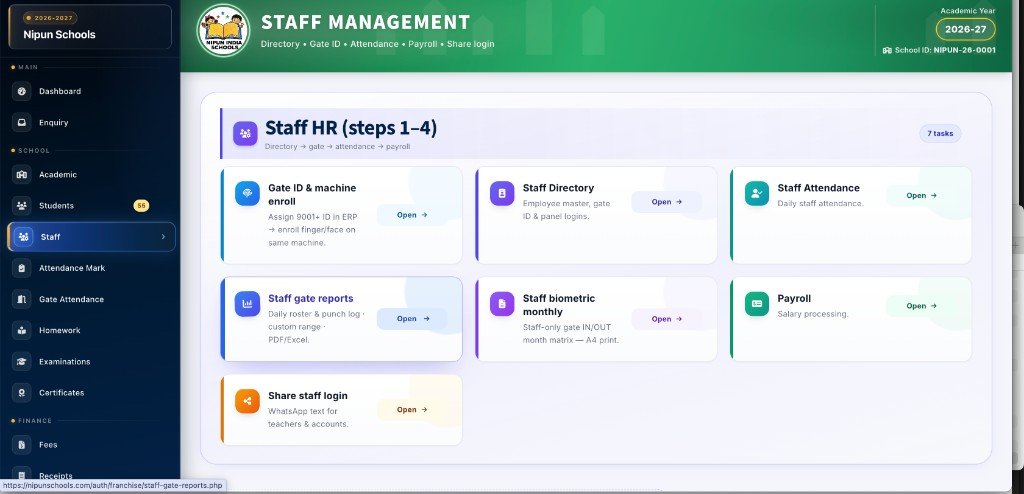
Real ERP screenshot — Staff HR: directory, gate ID, attendance, payroll & share staff login
Mobile app — how staff & parents use ERP data
Install one Android app (or use the mobile web portal). Pick Student, Parent or Teacher on login. Everything shown in the app comes from what the school already entered in ERP.
-
1
School creates users in ERP Students via admission / bulk import; staff via Staff Directory. Parent mobiles are stored on the student record.
-
2
Download Nipun Schools app One install for Student, Parent and Teacher roles — no need for three different apps.
-
3
Teacher uses ERP credentials Mark attendance, enter exam marks, post homework — synced with the same school database.
-
4
Parents see live school data Fee dues & receipts, attendance, homework, exam results, notices and live bus GPS for their child.
Examinations, marks, hall tickets & report cards
From Exam studio create unit tests / FA / SA, enter marks class-wise, print A4 hall tickets, publish results and print report cards. Online MCQ includes a separate IIT lane for IIT-track students.
-
1
Create assessment Examinations → Exam studio — set subjects, max marks and schedule in one place.
-
2
Enter marks Teachers / office use Enter marks grid per class, subject and paper.
-
3
Print hall tickets Generate hall tickets with photo, roll number, exam centre details — ready for A4 print / PDF.
-
4
Results & report cards Publish class results, ranks and print student report cards for parents.
Mockup: mark entry grid + printable hall ticket
Fees — structures, collect, receipts & all reports
Finance team defines fee structures (including IIT vs General tracks where needed), collects fees, prints receipts, and runs Daily / Monthly / Yearly / Due reports from the sidebar.
-
1
Fee structures & plans Create term / month heads and attach student fee plans from Fees menus.
-
2
Collect fees Search student → select dues → accept Cash / UPI / Card → print receipt instantly.
-
3
Receipts list Re-print or share any past receipt from Receipts in the sidebar.
-
4
Fee reports Daily collection, monthly summary, yearly overview and due / pending lists for follow-up.
Finance dashboard gives a quick view of collection vs due so principals can act the same day.
Mockup: fee collect screen + report shortcuts
Bus / transport — setup, fees, reports & GPS
Complete bus suite in sidebar order: Bus Setup → Bus Fees → Bus Reports. Assign students to routes, collect month-wise transport fees (with proration where configured), and let parents track the bus on mobile.
-
1
Bus Setup Create routes, stops, vehicles and drivers. Map students to the correct route / stop.
-
2
Bus Fees collect Month-wise transport fee collection — select months, collect and print transport receipts.
-
3
Bus Reports Route-wise, Daily, Monthly, Yearly and Pending transport reports for accounts & transport in-charge.
-
4
Live GPS on parent app When GPS is enabled for the vehicle, parents see live bus location under Bus tracking in the app.
Mockup: bus fee months + reports + GPS map
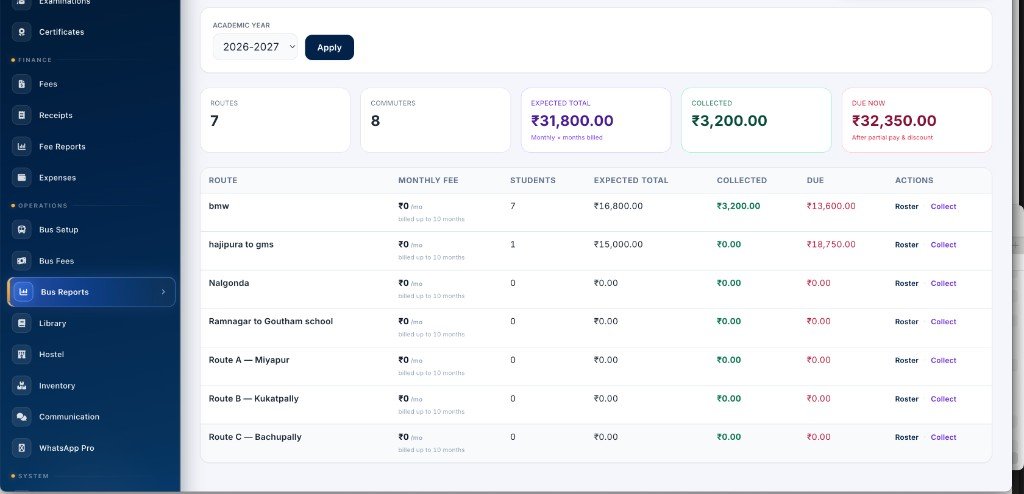
Real ERP screenshot — Bus reports: route-wise expected, collected & due with roster and collect actions
More modules in the same ERP
Beyond admissions, fees, exams and bus — schools also use these operational modules from the same sidebar. Everything stays under one login.
Library
Book catalogue, issue / return and student library history for the librarian desk.
Hostel
Hostel rooms, student allotment and hostel-related operations for residential schools.
Inventory
Track school stock — uniforms, books, lab items — with issue records.
Certificates & ID cards
Generate certificates and student ID / QR cards from enrolled student data.
Gate / biometric / QR
Pair tablets or fingerprint machines, enroll students & staff, view gate punch logs.
WhatsApp Pro
Send fee reminders, absence alerts and school notices using configured WhatsApp workflows.
Alumni
Keep former students in an alumni list for events and certificates.
Communication
School notices and announcements that sync to parent / student mobile views.
Expenses
Daily school expenses so accounts can track outflow alongside fee income.
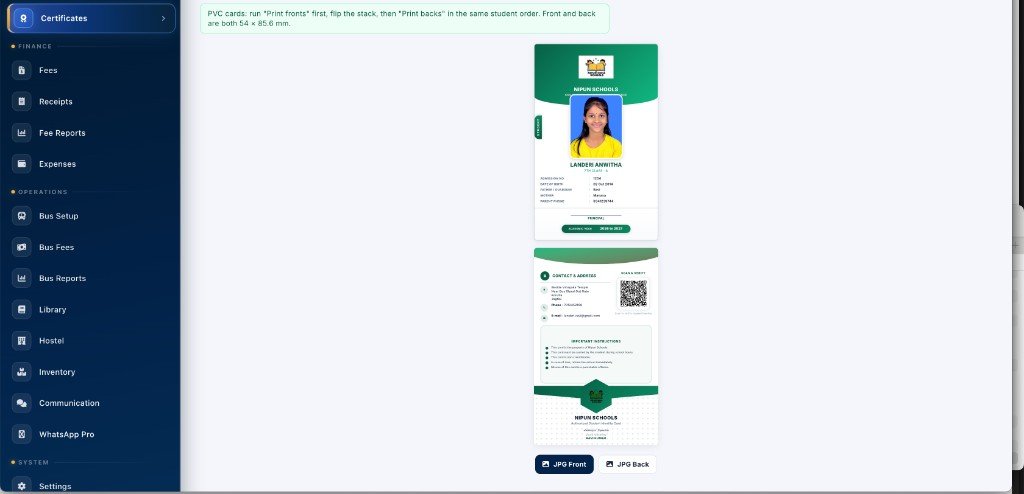
Real ERP screenshot — Certificates & ID cards: PVC student ID card front & back with QR, ready for print
From registration to daily school use
A clear adoption path helps each team start with the basics, verify data and then activate the workflows relevant to the school.
Register the school
Create the school account, receive the Unit ID and verify the owner / principal login.
School identitySet academic structure
Configure the academic year, classes, sections, subjects and timetable in order.
Academic setupAdd school records
Admit students individually or use bulk import; then create staff and assign roles.
Students & staffConfigure operations
Set fee plans, exam schedules, transport routes and the attendance method used by the school.
School workflowsShare role logins
Share staff credentials and help parents / students access their mobile role.
Team adoptionRun & review
Use dashboards and reports to review admissions, attendance, fees, exams and transport.
Daily control
Guided product session
Schedule free walkthrough
Bring your principal, office and accounts team to one demo
We can walk through the workflows in the same order your school will use them.
Why schools choose one connected ERP
The value is not just a list of modules. It is the connection between admission, student records, staff work, collections, exams, transport and parent communication.
Connected workflows
A student created once can move through fees, attendance, exams, ID cards and mobile access.
Controlled access
Role-based menus help each team work in the correct area while school ownership retains oversight.
Operational evidence
Receipts, registers, hall tickets, ID cards and reports provide printable records for daily administration.
Management visibility
Dashboards and due reports make pending work visible instead of leaving it across separate registers.
Frequently asked questions
Before your school starts
Can an existing school import students from Excel?
Yes. Use the bulk import template, upload the completed file, review validation results and then confirm the import.
Do teachers need separate web and mobile accounts?
No separate app-only account is required. Staff credentials created by the school are used for the relevant staff / teacher access.
Can classes 6–10 separate IIT and General students?
Yes. Admission supports IIT student and Non-IIT / General fee tracks for classes 6–10.
Which fee and bus reports are available?
The walkthrough covers daily, monthly, yearly and pending fee views, plus route-wise and period-based transport reports.
Can parents view school information on mobile?
Parent / student mobile views can include fees, receipts, attendance, homework, notices, exam results and bus tracking when configured.
Can we see the real screens before registration?
Yes. This page includes real ERP screenshots, and you can book a free guided demo for a live screen-by-screen walkthrough.
Ready for a live walkthrough with your school data?
This page shows the product flow with interactive mockups. Book a free demo and our team will open the real ERP screens for your principal, correspondent and accounts staff — or create your free school account and explore immediately.